Looking for a guide for a different GoPro? Check out all of my complete guides here:
Updated May 18, 2020
HERO5 & Karma Series
Karma Drone
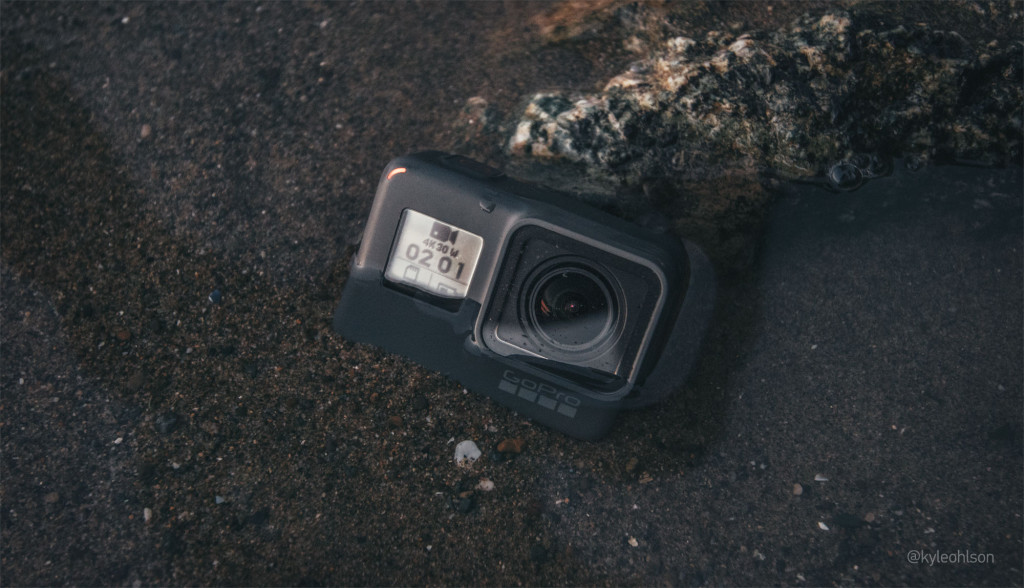
HERO5 Black
By now you’ve heard of the HERO5 Black, and probably all about the features that have been touted – touch screen, internal stabilization, voice control, etc. If you’re not familiar with the basics, I recommend watching the product overview video from GoPro. Great, so you’re caught up. In this post I’m going to make note of all of the things you haven’t heard. It’s lengthy, but you’ll come away knowing all of the finer details of the new features, as well as answers to the questions you’ve probably been asking. In this article, when I refer to “HERO5”, I’m talking specifically about the HERO5 Black, not the HERO5 Session.

In terms of video quality, the HERO5 Black adopted the same sensor & video modes as its predecessor, the HERO4 Black. You can expect to see similar video quality across the board between the old and new platforms if you’re trying to do some pixel peeping. You get up to 4K-30 on the resolution spectrum, and up to 1080-120 on the slow motion front (240 if you go into Narrow FOV). In my experience, I’ve seen noticeable color and sharpness improvements due to newer video tuning and better tolerances in the physical camera build. Photo quality also remains similar between platforms; however, the HERO5 comes with a slew of new photo features that expand the capabilities and quality if you’re looking to capture stills.
Aside from feature upgrades, there’s a considerable amount of new going on under the hood made possible by a new lower power/improved processor, new gyro/accelerometer hardware, GPS hardware, improved WiFi/Bluetooth hardware, and an entirely new audio system. Most notably, the HERO5 comes stock with a 2″ touch screen on the back, electronic image stabilization (EIS), voice control, a new de-fisheye’d mode for photos & video, RAW & HDR photo capture, stereo mics & ProTune audio, improved app connectivity/compatibility, and better battery life. On the firmware side of things, there’s been a considerable amount of features added to both ProTune photo & video settings. Some of these were released in a recent HERO4 upgrade, but there are also newer software additions worth mentioning (manual shutter & iso lock).

Touch Screen
The screen is a welcomed addition to the more capable Black Edition camera after having one in the HERO4 Silver for the past two years. There’s a whole new flow of selecting and adjusting the settings on the camera compared to previous models. The camera actually does a great job of walking you through the different settings and placements of features.
Basically the things you need to know are as follows:
Slide from the Top: All of the camera level settings (screen lock, connections, voice control, lights, default modes)
Slide from Right Side: Mode specific advanced settings (ProTune, additional features)
Slide from Left: Playback/Files
The rest of the settings (modes, resolutions, FOV, etc) can be adjusted by simply pressing on the individual settings at the bottom of the screen. Note – when opening the settings trays, slide your finger all the way across the screen (from edge to edge).
Live View of Settings Changes
Touch to Expose/Exposure Lock
Change Settings without Touch Screen
If the rear LCD screen is unavailable (you’re underwater, surfing, gloves on, etc) – you can still access all of the video/photo settings using the front LCD screen. Simply press the mode button (side), directly followed by the shutter button (top). From here, use the camera as you may have been used to with the HERO4 or earlier – the mode button advances to the next item, while the shutter changes values. To exit the settings menu, either scroll down to the exit menu item or hold down the shutter button for 2 seconds. Note that while you’re in the settings menu for the front LCD, the back LCD will be unavailable until you exit.
Electronic Image Stabilization (EIS)
The HERO5 touts new EIS software that helps reduce the small jitter or shake you’re used to seeing from typical GoPro footage. Basically the camera knows where it is in space at all times while you’re recording. It’ll use those tiny location changes to warp, rotate, and reposition the footage to keep a steady horizon. You will lose about 10% of field of view from the wide setting (because it needs to rotate/slide the image around), which is actually pretty minimal compared to other action cameras out there. GoPro optimized the amount of shake it would reduce vs the loss in field of view. If you switch into the medium FOV, combined with EIS, you’ll see a considerable improvement in the stabilization effects since it has that much more FOV to rotate/crop/adjust the original image.
When do I use EIS?
EIS is turned on by default in the HERO5, but when should you turn it off? In my experience EIS does an excellent job in reducing small shakes and jitters commonly seen in handheld cameras or vibrating mounted footage. If you’re doing POV or action, it depends on the activity and mount whether EIS is right for the job. The best use is if the camera is largely locked off in a single direction but shaking. For example, chest camera mountain biking would be a great use-case (one direction, but often shaky). I found head-camera skiing was a mixed case. It definitely makes it smooth, but gives some interesting effects when you start looking all around. It tries to pick center points to lock onto, so you’ll see the video footage sort of jump from one point in the frame to another part unnaturally. If you’re shooting in really dark environments you’ll get some interesting artifacts – so I recommend shutting it off for most lowlight capture. All in all, very impressive results, and it will be my go-to setting when hand-holding the camera for vlogging (if I ever vlogged), or when my mounting options aren’t super steady.
*EIS is available in all modes 60 FPS and below. EIS is not available in 4K.
Voice Control
Yes, we’ve all heard the HERO5 comes with voice control – but is it useful? Yes! To be honest I wasn’t a believer until I started using it practically out on the slopes. What it enables is on the fly switching between shooting a video to taking a photo to shooting a burst. Before voice control most of us used the method of “set it in the mode you’ll use that day” or pretty close to that, especially if your camera was mounted. Now even if a camera is on my head I’ll snap a couple photos, take a video, shoot a burst – all without ever touching anything. This video explains how it works:
GoPro Remo
If your camera is out of earshot, you can extend the range by using the Bluetooth connected GoPro Remo (sold separately). It has a microphone built in to accept all of the voice commands. It can attach to your wrist or be mounted to you like a lapel mic (both mounting options included). Also, the entire face of the Remo is a giant shutter button, so it doubles as an excellent action remote. With the GoPro RC it was always a bit tricky to make sure you nailed the shutter button instead of the settings or power button while doing your backflip. Now with the Remo you’ll never miss the shutter button. The GoPro Remo will stay connected for up to 8 hours after the last button press via Bluetooth, and has a range of about 30 feet.
Voice Command List
If you ever need a reminder of the list, they can be found under camera preferences by swiping down from the top. Scroll down under “Voice Control” and click on List of Commands.
GoPro Start/Stop Recording (works for video or timelapse – depends on current mode)
GoPro Start/Stop Video (starts video regardless of current mode)
GoPro Start/Stop Timelapse (starts timelapse regardless of current mode)
GoPro Take a Photo
GoPro Shoot Burst
GoPro Video Mode (Switches to video mode)
GoPro Photo Mode (Switches to photo mode)
GoPro Timelapse Mode (Switches to timelapse mode)
GoPro Burst Mode (Switches to burst mode)
GoPro HiLight, “That was Sick“, “Oh Shit” (sets a hilight tag 😛 )
GoPro Turn Off
*GoPro Turn On (Only available when connected & activated through GoPro Remo)
The one thing to remember with voice commands is to say “GoPro” before anything – sometimes it’s easy to forget. The only commands that do not require GoPro are “Oh shit”, and “That was sick”. Bonus points for enthusiasm. Don’t forget to enable voice control by swiping down from the top and tapping on the talking head icon in the top right.
Linear FOV/De-Fisheye
We all know and love the GoPro fisheye look, but sometimes it’s nice to get straight lines without doing heavy post work. The new linear mode is available for both photos and videos via the FOV menu setting. It warps the image in the camera to perfectly un-wrap the fisheye lens profile so lines are completely straight. The shots don’t look very GoPro at all – which is super cool to have the option and variety without having to switch lenses. These days if I’m flying a drone or doing any sort of scenic shot, I prefer a de-fisheye’d look. I like flat horizons and straight lines! You lose a bit of FOV by going linear – it crops in to feel more like the Medium FOV vs. wide.
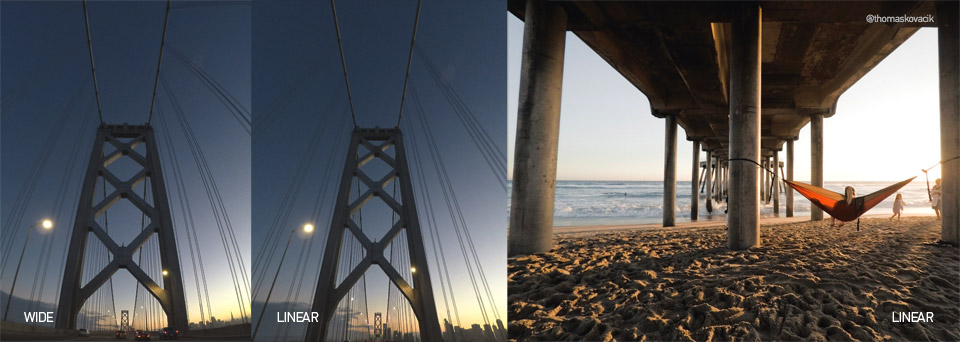
*Linear FOV is available in 2.7K & 1080P (16×9 video modes) up to 60FPS and all photo modes except RAW
RAW & WDR Photos
The HERO5 now supports RAW photo capture, as well as “wide dynamic range” (WDR) photos, which is similar to an HDR setting. Currently both settings are available in single photo mode. I suggest using voice control to easily snap RAW or WDR photos.
RAW Photo Capture
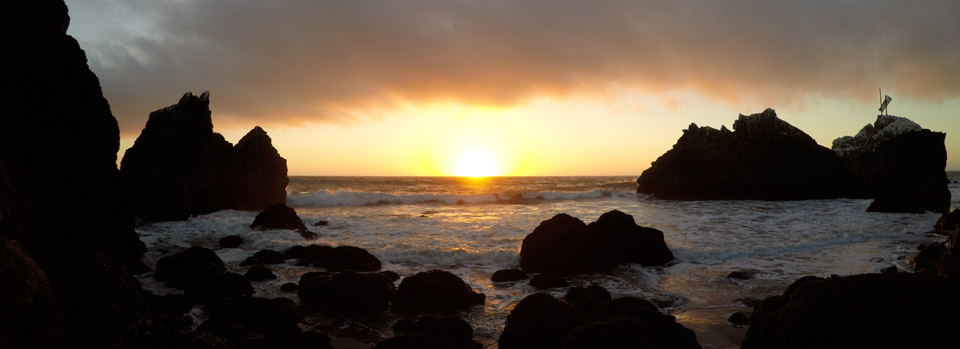
Capturing RAW photos allows for much higher quality post production if you plan on editing the photo later. There’s less compression and more information stored in every image. It’s a little hard to explain, but the gist is that it doesn’t pre-bake in any of the settings that have been pre-determined in terms of color/contrast/sharpness/noise, etc. You have the freedom to choose how and what gets applied to your image. If you’re shooting RAW it will also save out an adjacent JPEG image file. GoPro developed its own .GPR raw file format using VC-5 compression that the GoPro Cineform team developed. You’ll notice the file sizes are much smaller than that of a typical DSLR – which is due to the new compression algorithms for this type of raw format (The Weissman score is off the charts 😏). To work with the .GPR files, you’ll need the latest versions of Adobe Camera Raw or Adobe Lightroom. You can enable RAW by sliding past ProTune & WDR in the settings tray on the right.

The photo above was edited in Adobe Camera Raw. The same adjustments have been applied to both the JPEG and the RAW. You can see the JPEG has more artifacts around the horizon shapes as well as a lack of color and smooth gradients in the sky. Zooming way in we can see the JPEG has had noise reduction applied, where the RAW version has not. The RAW will look grainier since there’s no noise reduction, but it’ll hold much more detail. See detailed view below.

WDR Photo Capture
If you’re looking to capture a scene that has intense shadows and bright white, WDR is a setting that uses the 12-bit raw source to tone map the photo and present a wider dynamic range than a standard JPEG. It does a great job of evening out a scene that would otherwise blow out or be too crushed in the blacks. WDR can be accessed & enabled by swiping past ProTune in the tray on the right side. WDR and RAW cannot be enabled at the same time.

Stereo Microphones & ProTune Audio
The HERO5 has an all new audio setup, utilizing 3 different microphones to suppress wind and give proper stereo audio. It’ll constantly monitor all 3 mics and use the data to pull the best sounding bands from each. It also uses the 3 mics to triangulate the location of sounds to figure out a proper left and right track to build the stereo audio. There are two new settings to manipulate the audio: Manual Audio Control and ProTune Audio.
Manual Audio Control
By default, the HERO5 automatically switches between wind reduction audio & stereo audio. It’ll still kick out a stereo track but it won’t always be triangulating location. If you enable manual audio control, you can choose to lock your GoPro in either wind reduction mode or stereo audio mode. You access manual audio control by swiping the right tray out and scrolling all the way to the end past ProTune, EIS, and Auto Low Light.
ProTune Audio Track
A new feature in the HERO5 is the addition of the ProTune audio track. If enabled, your GoPro will save an additional high quality audio .wav file adjacent to your video file on your SD card. The standard GoPro audio on your video file will have a good amount of processing done to it – auto gain control (AGC), wind reduction (if manual audio control is turned off), and more. The ProTune audio track allows you to control this processing in an additional audio file. You can control the level of audio processing you want done to this separate .wav file with 3 different settings: Low, Medium, & High.
LOW – Applies minimal processing to the audio file. Saves a .wav file with 3 separate audio tracks – one for each mic on the camera.
MEDIUM – Applies some processing, including your manual audio choice if enabled (stereo or wind).
HIGH – Fully processed audio (matches the audio that you’ll find attached with your video – but higher quality).
You can access ProTune Audio in the ProTune video settings under “Audio”. By default it is set to OFF.
Improved App Connectivity & Compatibility
Coupling the WiFi/Bluetooth components with the new processor in the HERO5 allows for a much better connection experience to your phone or tablet. The GoPro app is now branded as “Capture”, and it’ll do a good job of walking you through the connection process. Basically you just need to connect to the HERO5 WiFi on your phone, and the app will automatically do the Bluetooth handshake. From here, file copying happens faster, as well as improved live-view.
Live Video Preview While Recording in All Modes
One major improvement is the HERO5 supports live video preview on your mobile device while you record in all modes. In the HERO4, 2.7K-60, 1080-120, and a few other high performance modes do not support live video preview while recording. For me personally, I use a phone to monitor my video recording while filming in the field. I always limited myself to 2.7K-48 so I could have live-view while recording.
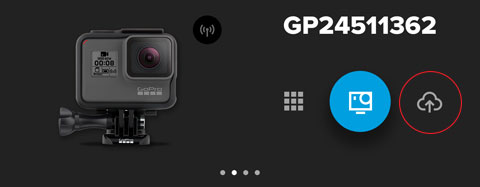
Auto Upload to the Cloud
GoPro has introduced a new cloud system for easy access to all of your content via web, desktop, or mobile device. Cloud access is part of a new subscription service called GoPro Plus ($4.99 a month). To access the cloud setup, connect your HERO5 to the Capture app, then click the cloud icon next to the camera on the home screen in the app.
The next time the camera is plugged in to charge, it’ll automatically connect up to your home network WiFi and upload your files to the cloud. Your files can also get uploaded through GoPro Quik on desktop or manually through a web portal (plus.gopro.com). You can then use the cloud to access your files from any device (web portal or Capture App). You will also have access to those files in GoPro Quik for easy & quick editing. If you plan on using the cloud often, you may want to get in the habit of recording short & deliberate clips so the action moments you want are easily found/downloadable from the cloud. One thing to note is GoPro Plus isn’t necessarily a backup system. The files uploaded to the cloud are 1080P 15Mbit versions of your files – so if you’re recording in 2.7K-60, the file on the cloud will be 1080-60 (for comparison, data-rates of files recorded on the camera are between 45 and 60 Mbit). This is great for fast access and sharing on the web – the quality loss isn’t really noticeable on mobile/web videos; however, if you’re expecting a full backup of all of your files, it’s not the same.
Connections Management & Battery
Lastly, you’ll notice there’s no physical WiFi button on the camera or big blinking blue lights; in fact, to turn off the WiFi connections, it’s a little hidden in the “Connect” menu from the top tray. At the very bottom of the Connect preferences is a “Wireless Connections” power button. This is mostly due to the connections being much smarter and using a lot less power – GoPro didn’t want people to have to think about whether WiFi was on or off. Bluetooth manages the WiFi connections – it’ll turn on WiFi for 20 minutes when you’re using the Capture app, and then power it down. From there, Bluetooth will remain on for 8 more hours, even if the camera is off (in case you want to use Bluetooth peripherals to power on the camera, like GoPro Remo or Capture app). After 8 hours if there’s no button presses, all connections will shut off. If you power your camera back on manually, Bluetooth will turn back on automatically for 8 more hours. You’ll be happy to know that after 8 hours of Bluetooth being on, the battery level will only drop by about 2%.
Battery Life
Battery life is always a big question – and I haven’t seen a lot of information floating around about the HERO5 battery. For starters, there’s a new battery (removable) in a new form factor compared with the old HERO4 batteries. The new one is 1220mAh, while the HERO4 was 1160mAh. The big kicker with the HERO5 is its new low power/lower heat processor. I did some quick and dirty battery tests, but here’s what I found:
2.7K-30 || all extras OFF || 1 hour 55 min recording time
2.7K-30 || GPS On, Voice Control On, Linear FOV, EIS On, WiFi/Bluetooth On, ProTune Audio On || 1 hour 43 min recording time
4K-30 || all extras OFF || 1 hour 40 min recording time
I first did the tests in 2.7K-30 so I could utilize all of those extra features (EIS, linear FOV, etc) to see if they had a significant effect on battery. I can’t tell you which ones impact the battery the most, but the good thing is with everything on we’re only seeing a 10% loss in overall battery life. If we were to compare the 4K-30 results to the HERO4, our average battery life was around 1 hour 15 min of recording time.
You’ll also notice the battery power is now measured in terms of % instead of the 3 bars in the HERO4. It’s much nicer to know exactly how much battery you have left at any given time.
GPS
The HERO5 has GPS built in, which is on by default. You can turn it off in the system preferences in the menu. When on, it’ll save the location for your pictures and videos. Also, if you load in your videos using Quik for desktop, you’ll have access to a range of telemetry gauges showing speed, G-Forces, location/route, distance/height, etc. Just load the videos in Quick, double click on the individual video and a gauges icon will appear below. If you’d like to save out that individual file, click the scissors button below to save a copy.
Expanded Video & Photo Control with ProTune
Lastly, we were given some exciting ProTune photo and video controls in the latest HERO4 firmware upgrade, but I will briefly outline them here since they come standard in the HERO5. They are ISO limiting in Photos and manual shutter/ISO in video. Both of these settings should be thought of as pretty pro-level adjustments.
ISO Limits on Photos
You can now set minimum and maximum limits for the ISO in all photo modes. This allows greater control over shutter times and quality of your photos. If you need fast action and don’t mind the quality loss of high ISO, you could set higher minimum limits to force photos into higher ISO. For example, if I set my minimum and maximum to 100, the camera is going to look to a longer shutter time to make up for the need for light. In a test I did in my house, at a 100 min & max, the shutter speed was 1/50 sec. Setting the min & max to 1600, the shutter speed was 1/850 sec (~20x faster). Utilizing this in the field, you can either force the camera into longer exposures with higher quality (low ISO), or force fast shutter speed to pause action without blur.
Manual Shutter & ISO Lock in Video
A huge new feature for the pro content creator is manual shutter lock and ISO lock. In ProTune video, you now have the option to leave the shutter at auto, or lock it at the speed of the frame rate plus 3 additional stops down (multiples of the frame rate). For example, if I’m shooting at 4K-30, I can lock the shutter speed at 1/30, 1/60, 1/120, or 1/240. From here, you can set your ISO limit, or lock the ISO for full manual exposure control. Currently if you’re in auto shutter, you can only limit/lock the ISO to a minimum of 400. Once you lock the shutter, it will enable you to limit or lock the ISO down to 100.

These settings are very key when filming drone footage. If you look down, the camera tends to overexpose the ground since it tries to auto adjust to the scene. In reality, you want the ground to be dark and rich – which usually requires an EV comp change. Instead of adjusting the exposure to combat the auto exposure, you can simply lock the proper exposure & ISO values before you start. I set my shutter speed and ISO lock for the scene looking straight ahead, which makes for rich footage whether you’re looking up, down, or backwards. Typically if you’re filming in bright daylight, even 1/240 sec isn’t quite dark enough – so you’ll want to make up the difference using ND filters (ND 4, 8, or 16). ND filters are basically sunglasses for your camera. ND 4 is the lightest, while ND 16 is 2 stops darker than that. Polar Pro makes some great filters and should be releasing some for the HERO5 shortly.
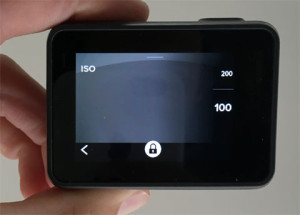
To lock the ISO on the HERO5, you must first set the shutter speed on something other than auto. Next when you’re adjusting ISO in the ProTune settings, press the semi-transparent lock button in the bottom middle of the screen (it’s a little easy to miss). Once the lock button is pressed, it’ll enable ISO 100 & 200. Something to note is you can still press and hold the rear LCD screen to set or lock the exposure location; however, it will disable your manual shutter & ISO settings.
Filming in lowlight using ISO 100 and low shutter speeds like 1/30 or 1/60 makes for some very unique and beautiful results. You’ll have rich blacks and content without any sort of grain or noise. It’ll be dark footage so I’ve used it for filming fireworks, music concerts, and camp-fires. Try it out! The following is a crop from a video clip straight from the camera – 4K-30, shutter 1/60, ISO lock 100.
Waterproof
Oh yeah, it’s also waterproof without a housing.
Thanks for taking the time to get through this article! As always, if you have any questions – don’t hesitate to ask below. I will do my best to answer, or a passionate reader will help you out! I’ll be releasing more information about HERO5 Session & Karma in the coming weeks. Stay tuned!